My Price-less (seriously, it was FREE!) Nightstand

Cover Pic Free Nightstand

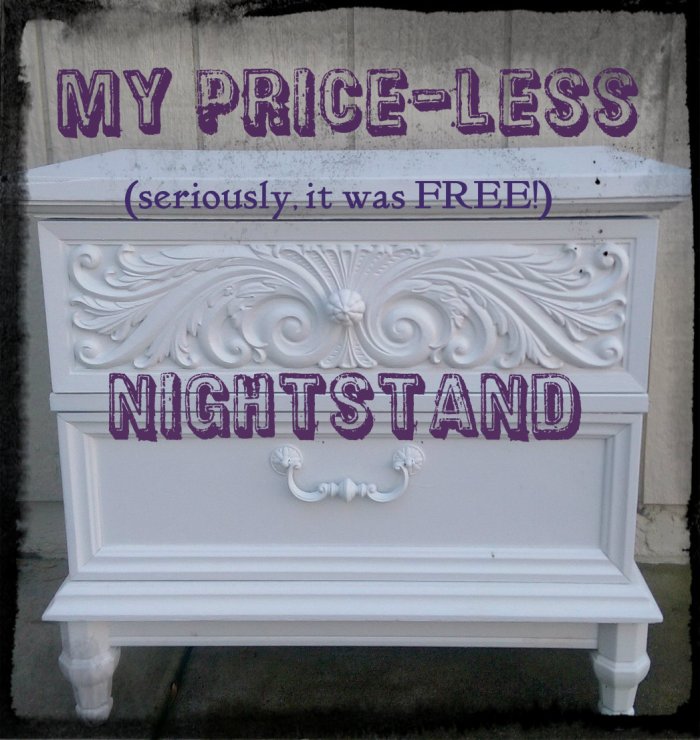
Do you want to know my favorite price?  Free, of course!  Same with you?  I like to peruse the Free section of Craigslist every once in a while.  Have you ever done that?  People give away all kinds of stuff:  pianos, boats, yard sale left overs, plaid couches, building supplies, pets, etc., etc., etc..  For the most part, I’m not the least bit interested in what I see, but a few months ago I saw this awesome nightstand posted:

Free Craigslist Nightstand Unpainted

School lesson:  The suffix “less” means “without”.  In other words, without a price.  Free.  Remember…that’s my favorite price.  Yep, this nightstand was price-less.  You can bet that I snapped it up!  Once I got it home, it went straight to the back of my garage, where all good projects go to wait their turn to become awesome.  Soon thereafter, HomeRight kindly sent me this awesome paint sprayer:

homeright-finish-max

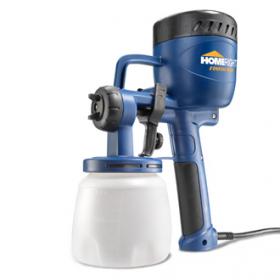
The HomeRight Finish Max Fine Finish HVLP Sprayer.  Imagine a choir of angels singing…I swear that’s what I heard when the package arrived.  Thank you HomeRight!

My free (I love saying that!) nightstand was the first project that I decided to tackle with my new sprayer.  Piece of advice…read the instructions + follow the instructions when you are tackling the unknown.  Smart people wrote those instructions, but, after reading them, I decided that I know what I’m doing.  I have painted a lot.  I mean, a lot, so I decided that there was no need to thin the paint.  Big mistake.  Once I humbled myself and thinned the paint like I should have in the first place, the thing worked like a dream.  I think it took about 3 minutes to paint the whole first coat.  Seriously, it took more time to open the paint, mix a batch of chalk paint (thinned a bit…the instructions show just how much), and walk out to the garage than it did to paint my nightstand.  I was insanely impressed!

Hold it!  I’m getting ahead of myself.  Before I started painting I had some prep, of course.  Worst part of painting furniture, wouldn’t you agree?   Actually, it was just a bit of hand sanding.  I lived through it, somehow.

Even though it is widely known that chalk paint can go on pretty much any surface, I decided to spray on some canned primer just because.  I remember watching a YouTube video years ago of Annie Sloan hand painting a dresser and she painted the handles at the same time with the same paint that she painted the dresser.  I really like the look of the handles being more of a texture, not a standout color, so I decided to also spray a coat of primer on those.

Spray Primed Decorative Nightstand

Ready for the after?  Want to see what 2 coats of paint and about 6 minutes of total spraying time with my new HomeRight sprayer can do?  Well, here you go!

White Painted Decorative Nightstand

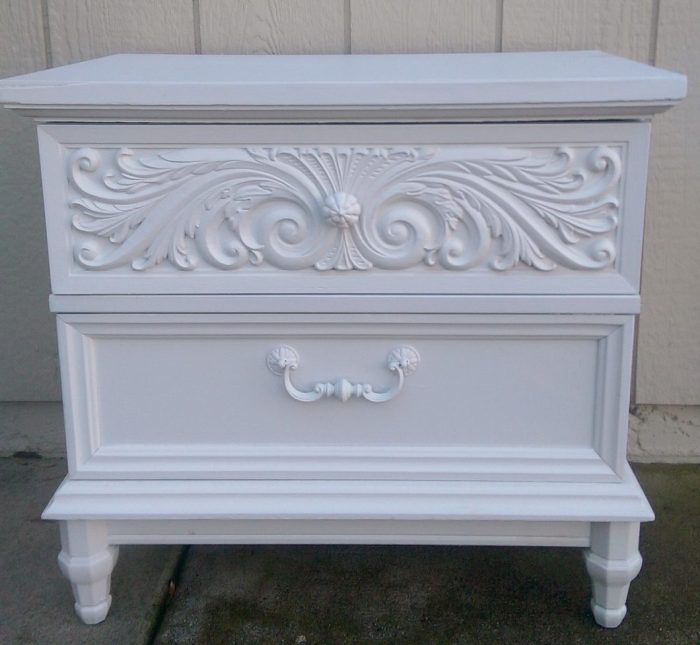
Do. You. Love. It?  My price-less nightstand?  I totally do, but I’m not done yet.  Check back soon to see the finished product.  I also plan to share some things that I have learned by using my paint sprayer.  I’ll keep you posted.  Now, head right over to your local Craigslist and check out the Free section.  Hope you find something good!


*********Linking up to these awesome parties*********


Scraptastic Saturday Featuredsm


DIY Faux Textured Glass

I’m about to show you something that will blow…your…mind.

Cover Pic Faux Textured Glass

That’s right…I figured out how to make my own faux textured glass and I can’t wait to show you how.  Truth be told, I’ve been using this product for several years now:

Gallery Glass Crystal Clear

The first time that I used it was purely out of necessity.  We had a huge custom triangle-ish shaped window in our old house that had moisture damage and looked horrible.  I decided to do a stain glass look using Gallery Glass products.  Using their liquid lead striping, I created a Craftsman style border around the whole window using different shades of greens as well as the Crystal Clear.  Did I mention that this window was huge?  7 foot at the tallest part,  8 foot at the widest.  It seriously took forever just to do the border.  When that was done, I still had a huge window that looked moisture damaged.  Ignoring the instructions that said NOT to brush the product on, I poured the Crystal Clear in a bowl, grabbed a wide paintbrush and filled in the rest of the window with brushstrokes, making my own textured glass look that hid the moisture damage.  That was nearly 15 years ago and, as far as I know, it is still holding up.  Cheap and long-lasting fix!

I have a couple of other DIY faux textured glass tricks up my sleeve that I will reveal another time, but I just have to show you the technique that I dreamed up today.  The process is really simple.  (Place your mouse cursor over each image, or click on it, to see the simple instructions)

Now, for my textured pattern maker: dun, Dun, DUN… textured wallpaper!  If you know me, you know that I LOVE textured wallpaper for crafting.

After rolling over the back of the wallpaper, I gently lifted it off.  Truth be told, I had a little too much GG and the image was a bit smeary.  No problem.  I just used a paper towel to remove some of the product, then re-smeared and re-stamped.

This is what it looked like when I peeled off the textured wallpaper:

Gallery Glass textured

You might notice some little wormy looking imprints.  Of course I didn’t let them stay.  Rather than start over again, I just used my finger to smear those areas out, adding little “polka dots” all throughout the glass.  Because of past experience, I knew that those dots would blend in just fine when the product was dry.

This is what it looked like as it was drying:

Gallery Glass textured

Notice my little dots?  Don’t worry, they will almost disappear.

So……….I found out that it is not easy photographing clear textured glass.  I tried about a hundred ways to get some decent pictures for you, I really did!  In person, it is a really cool effect.  In a photograph, it is much harder to see, but here goes:


Faux textured glass using Gallery Glass

Faux textured glass using Gallery Glass

Faux textured glass using Gallery Glass

It worked!!!  I’m thrilled…giddy…ecstatic! Once I get it in my frame and vinyl lettering added, I will show you the final, final product.

Until then, what do you think of my Faux Textured Glass?


*********Linking up to these awesome parties*********

I was featured!

Craft Frenzy Friday


As a follow-up, I went to and saw the following Q&A regarding Gallery Glass that I found interesting;

Q: Do you need to use a sealer over Gallery Glass® Window Color™ or Liquid Leading™?

A: Gallery Glass Protective Sealer is recommended for all projects, especially window clings and designs in high humidity areas. The sealer will resist dust and fingerprint impressions as well as protect against condensation in moist areas. – See more at: https://www.plaidonline.com/gallery-glass/brand/detail.htm#sthash.7y3GGCHg.dpuf


Creative Tablecloth Ideas

Creative Table Cloth Ideas

I love tablecloths.  I really do!  Do you wanna know why?  Since dining tables are usually at least somewhat large, when you change the tablecloth, you can change the whole look of a room.  Do you believe me?  Think about what a huge difference it makes to throw a different bedspread or comforter on your bed, it’s the same idea.  Bingo!  The whole room seems to change, am I right?  Of course I am!  Changing the tablecloth could almost be akin to painting a wall.  Only much quicker, less messy and, for fickle decorators like me, much easier to change the look of a room on a whim.

I have plenty of tablecloths.  More than I should have, probably.  I’m fickle, remember?  I’ve noticed that in recent months, however, I really don’t use my real tablecloths very often.  I have gotten creative and now use drapes and shower curtains instead and, I must say that I like the look of them so much more than my real tablecloths.  Want to see?

First, my current favorite:

Decorative Shower Curtain Used as a Tablecloth

This Moroccan-looking number is the most amazing shade of blue.  I can’t figure out how to photograph the color perfectly.

Close up of decorative shower curtain

I love how the black flocked design is so bold.  Yep, I love this shower curtain…turned table cloth.

Here is a shower curtain that I bought at Goodwill for $3.  I love-a-love-a-love it!  It is practically dripping with texture:

Decorative shower curtain used as a tablecloth

Close up of decorative shower curtain

I also have some curtain panels that I like to use as tablecloths:

Here are some close-up pics so you can really appreciate the textures:

Yeah…I really like my pseudo-tablecloths.  They don’t look exactly like what I see over and over in the tablecloth departments of stores.  It’s a pretty fair bet that I’m not going to walk into anyone else’s home and see that their table matches mine.  Call me crazy.  Call me creative.  Just don’t call me late for dinner (set on one of these creative table cloths, of course!).

What do you think?  Have you ever stepped outside of the box and used something other than a tablecloth for a table cloth?


*********Linking up to these awesome parties*********

Easy Recycled Gift Tags


Recycled gift tags

It’s time for Christmas gift buying, gift wrapping and gift tagging.  Don’t you just love Christmas time?   To me, wrapping presents is fun and pretty relaxing, but I’ll admit that one of my least favorite parts of wrapping is tagging my wrapped gifts.  Am I the only one?  I always make sure to buy gift tags at the after-Christmas sales so I have plenty on hand, but the things make me crazy.  The plain ones are often, well…boring and the beautiful foiled ones always seem to repel ink.   Seriously, someone should test those things out before they sell them as gift tags.  It seems that if I can find a pen that actually writes on them, the ink always smears when I try to stick it on the package.   Urrgggh.

This year, I decided to make some more permanent tags.  I went as far as my recycling bin to find my main supplies-  these empty thin cardboard boxes:

Empty food cartons for gift tags

First thing that I did was to cut simple tag shapes, pairing two for each tag.  I made sure that the plain side faced out as I cut them, because really, who really wants a picture of a tri tip sandwich on their gift tag.

recycled cardboard gift tags

The first couple of tags that I made had a layer of flannel sandwiched between them:

As you can see, I used a tiny loop of tape to hold each side of the fabric/cardboard in place, making sure to line the cardboard up well.  Easy.  Next, I took it to my sewing machine and used a long, straight stitch around the whole thing.  I made sure to start at the center-top of the tag and overlapped a few stitches to secure the thread, knowing that the ribbon would hide the cut threads.  Once the sewing was complete, I trimmed the fabric to the actual shape of the tag.  For added effect, I frayed the flannel edges of one of my tags, and the other tag I snipped lots of tiny cuts along the whole fabric edge to create my own fringe.

After doing a couple this way, I got lazy and just ended up gluing the two pieces of cardboard together, skipping the flannel.  I think that I prefer this simpler look, actually, and it makes tag making so much easier and faster.  Once the tag layers were secured, I used my hole punch at the top.

Of course I could have hand-written the names on these, but instead I went to my computer and found some fun, bold fonts which I printed in large sizes and glued on my tags.  I used white paper, but colored or lightly patterned paper would be fun, too.   Glitter, stickers, and other embellishments would spiff these up even more.  Really, the sky’s the limit on what you could do with these.   You can have all of your tags exactly the same, with only the names different, or you can color code for each child/recipient, or you can make each tag totally different.

Gift tags made from recycled carton cardboard

You might think that, with the rush and fun and craziness of Christmas morning unwrapping that these tags will just get tossed in with the other trash.  Maybe…maybe not.  These gift tags are actually very study and feel substantial in your hands.  I don’t think that they will easily get mixed up with tossed gift wrap and bows.  I’m going to tell my children to save them so I can use them next year…and the year after that…and the year after that, etc., etc. .

What started out as trash will be avoiding the trashcan for years to come.  That’s the plan.  Now, I just need to invade my recycling bin again to make a couple dozen more tags.

So, do you have any empty cereal, crackers, or other thin cardboard boxes in your trash right now?  I think it’s time to rescue them!


*********Linking up to these awesome parties*********


Easy DIY Gift: Corn Heating Pads

DIY Corn Heating Pads

It’s that time of year again!  Eeeek!  The Holidays!  Thanksgiving…Christmas…New Year’s…I love it all!  Right now I should be packing for our trip to Utah, but I just have to share what I have been working on (instead of packing!).  Making microwavable feed corn heating pads!

Last year I blogged about making rice heating pads using pillow cases.  They really are simple to make and we love using them.  After being over-heated too many times, however, the burned rice smell can get a bit nauseating,  so I decided to try something different: Feed corn.

Feed Corn

My friend Patrice told me about feed corn heating “bags” years ago and how they don’t smell like rice does and how they hold the heat longer than rice.  I decided to give corn a whirl.

Just so you know, feed corn is dirt cheap.  I paid $12 for a 50 lb. bag.  For the fabric, I found a really nice heavy full size flat sheet with a plaid pattern that is a dream to sew on.  I love plaid because the lines make it easier to cut and sew straight lines.  I like to start out with a piece of fabric that is about 25 inches by 14 inches, but really, you can make these any size and shape.

WP_20151124_005

With this size, I add 2 scant cups of corn to each of the outside edges and 2 1/2 cups to the larger center section.  Again you can go to my tutorial to see how to make these.  Once you get the hang of it, you could probably rival Santa’s elves in gift making!

WP_20151124_010

Oh, another fabric idea:  My son had outgrown his Grinch pajama bottoms, so I just cut off the legs, straightened out the seams to form rectangles and made microwavable heating pads out of them, as well.

WP_20151124_013

As a side note, these take a bit longer to heat up than the rice ones do.  I would start with 2 1/2 minutes, but I like how it feels after 3 minutes.  For heaven’s sakes, don’t overheat them and fry yourselves!  Or anyone else!

WP_20151124_011

 If you are stumped about what to get for anyone this Holiday season, I guarantee that these microwavable feed corn heating pads will be a hit.  Moms, dads, grandparents, teachers, siblings, friends, children of all ages will love them.   They are great for aches and pains, for warming cold tooties and pre-warming a bed on a cold winter night.  Trust me on this one…these heating pads are a popular commodity in our home.

*********Linking up to these awesome parties*********