
Fall is in the air…isn’t that exciting? Around here, that means that we are no longer having triple digit temperatures. Woo hoo! With daytime highs of less than 85 degrees and night time lows in the 50’s, I’m in the mood for everything Autumn. The other day I got the hankering to just make something new to add to my Fall decorating. I gave myself a challenge. Do you ever do that? My challenge was that I would use materials that I already own and create something I’ve never seen before. Here is what I decided to work with:
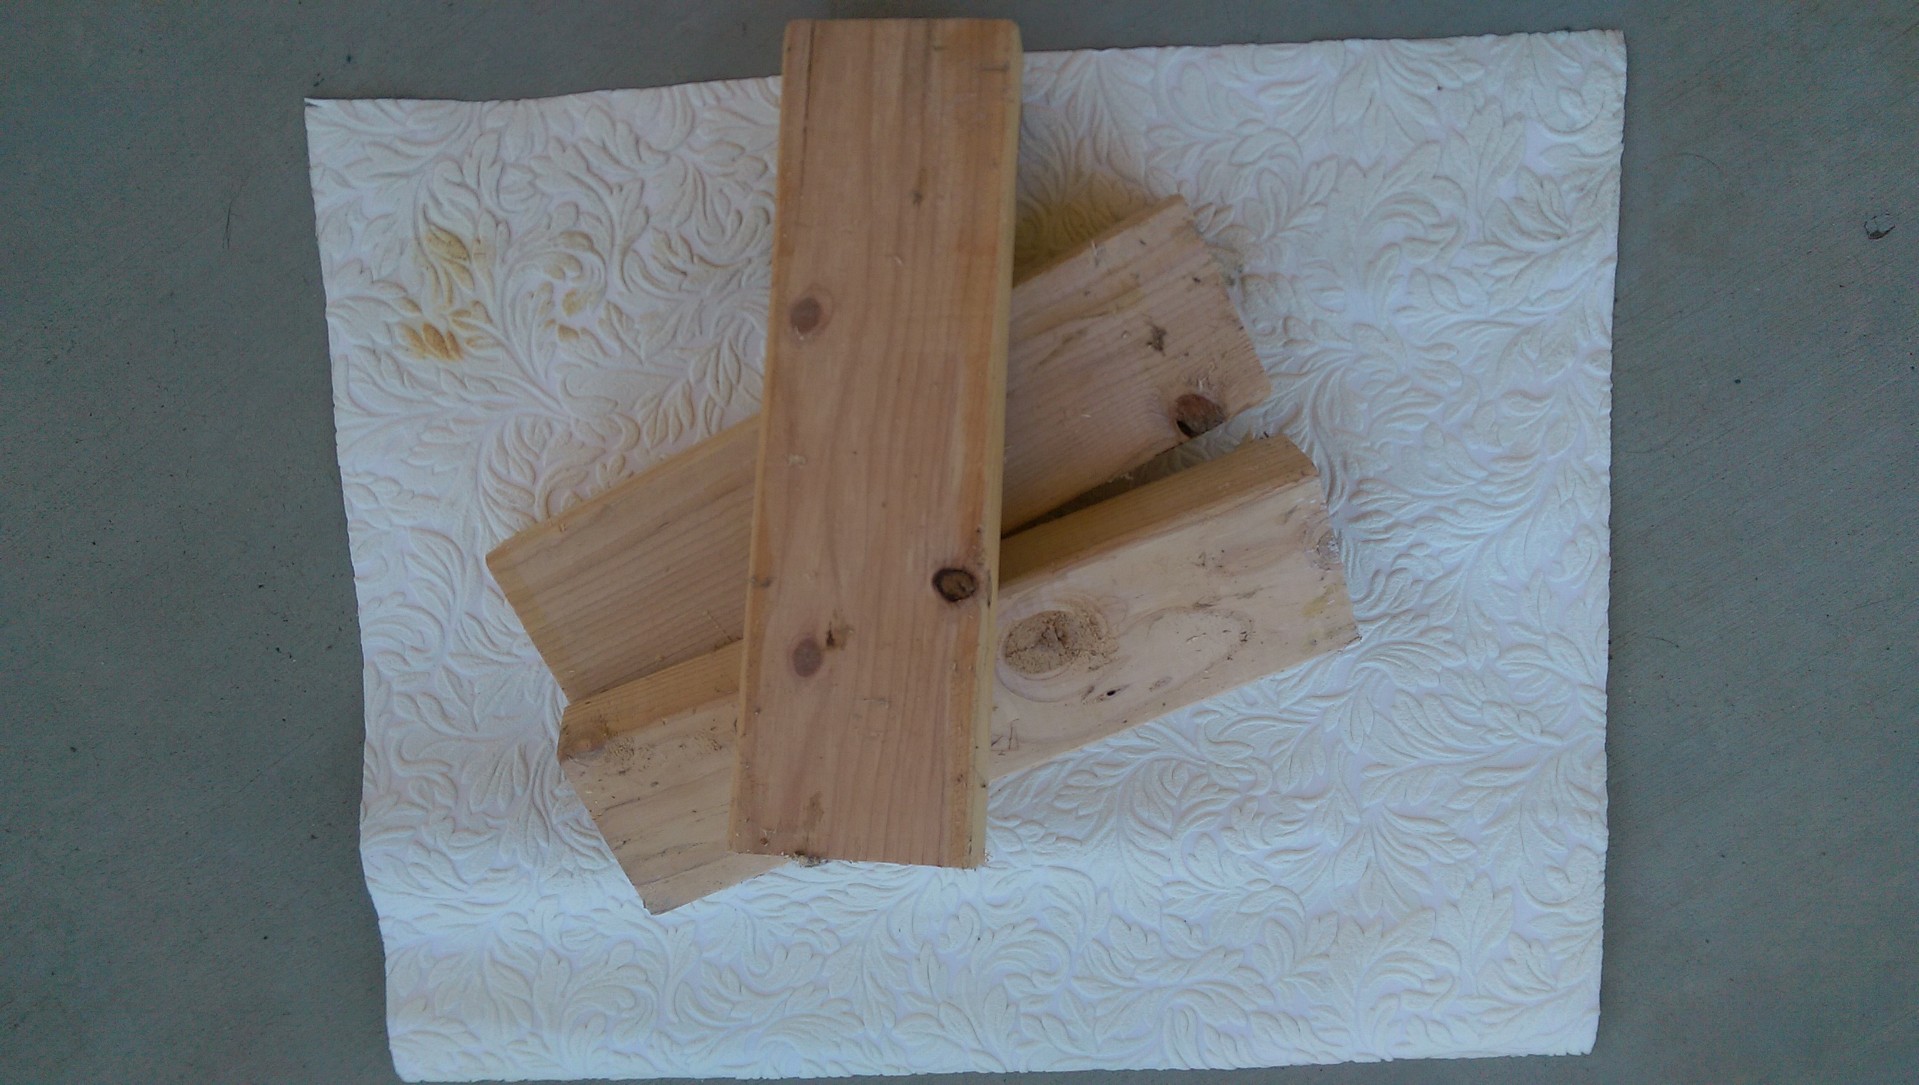
Some stained old textured wallpaper and 3 scrap pieces of 2×4 left over from a garage shelving project. Are you inspired? I was. Wanna see what I made?
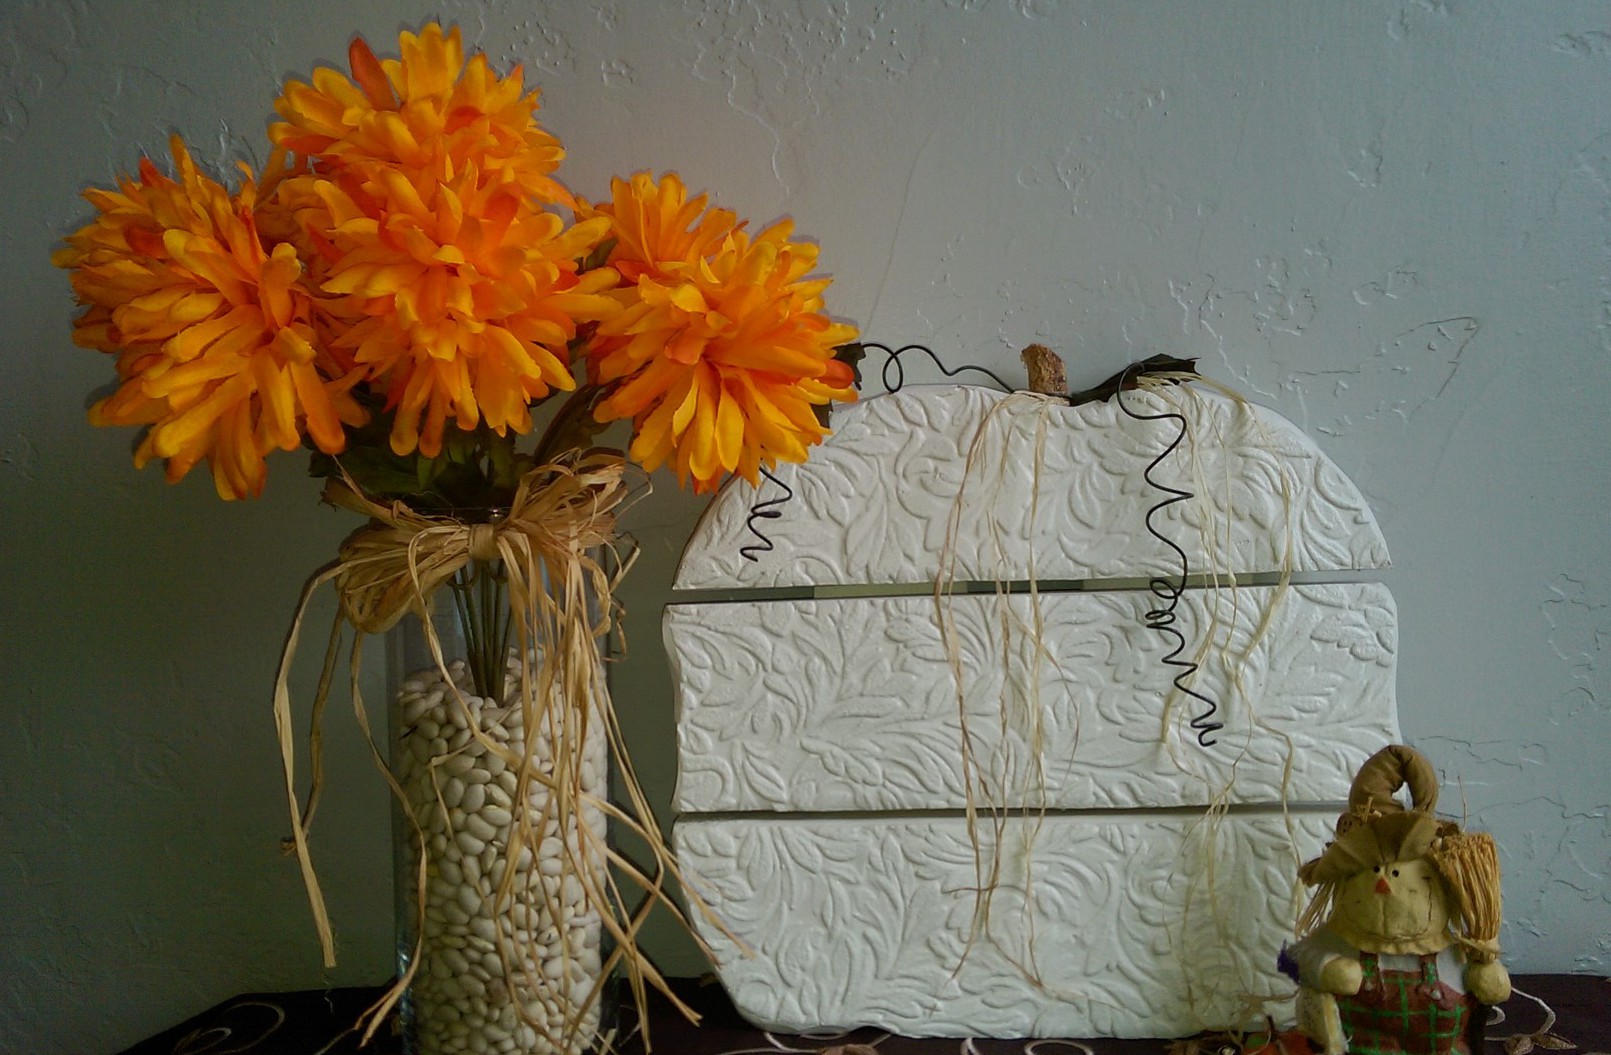
Turned out okay, don’t you think? I happen to love it! Would you like to see how I made it? Alright. Here we go:
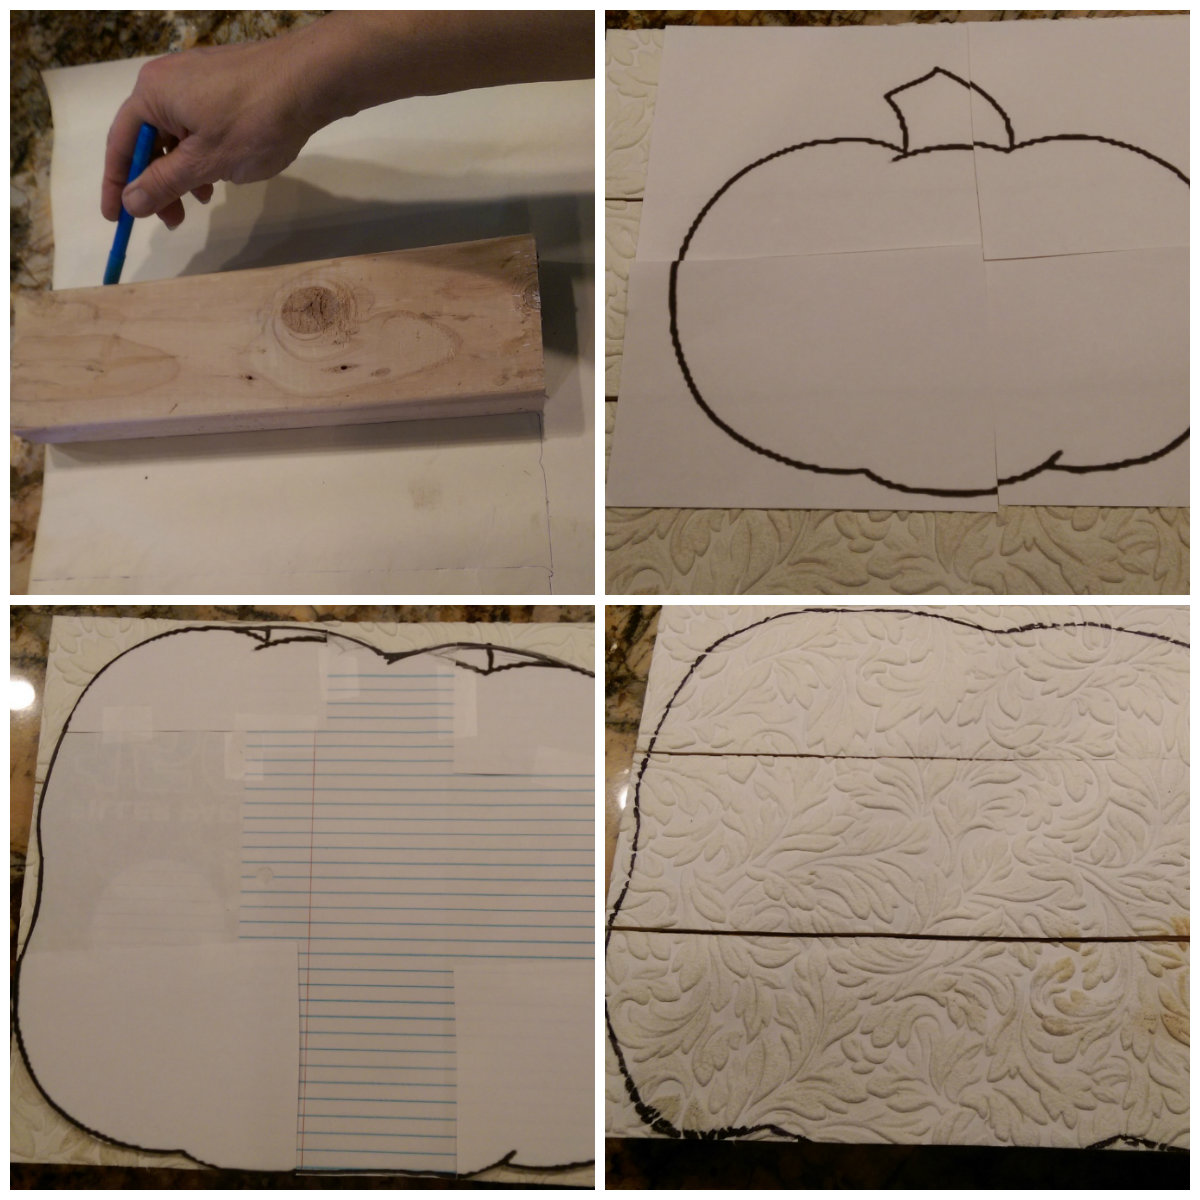
First step, I cut out the textured wallpaper. I wanted a continuous pattern so I traced around the 2×4’s, stacked vertically, on the back side of the wallpaper. After cutting out the wallpaper, I glued a strip down on each of the 2×4’s using regular white glue. Easy. To make sure that it didn’t bubble, I stacked them up and weighed them down with books. As the glue dried I made up a pattern. Kind of. I’m not an artist so I went to the computer and found a basic pumpkin template. I printed it out then cut the image in 4 pieces so I could stretch it out to make a larger size. After taping it down to a large sheet of (pieced together) paper, I drew in my own lines. Next step, I cut out the paper template and then transferred the pumpkin shape to my textured wallpaper 2×4’s, again making sure that the pattern was continuous.
After cutting the individual pieces out, I sanded random dents in the edges to make them more rounded and textured. See?
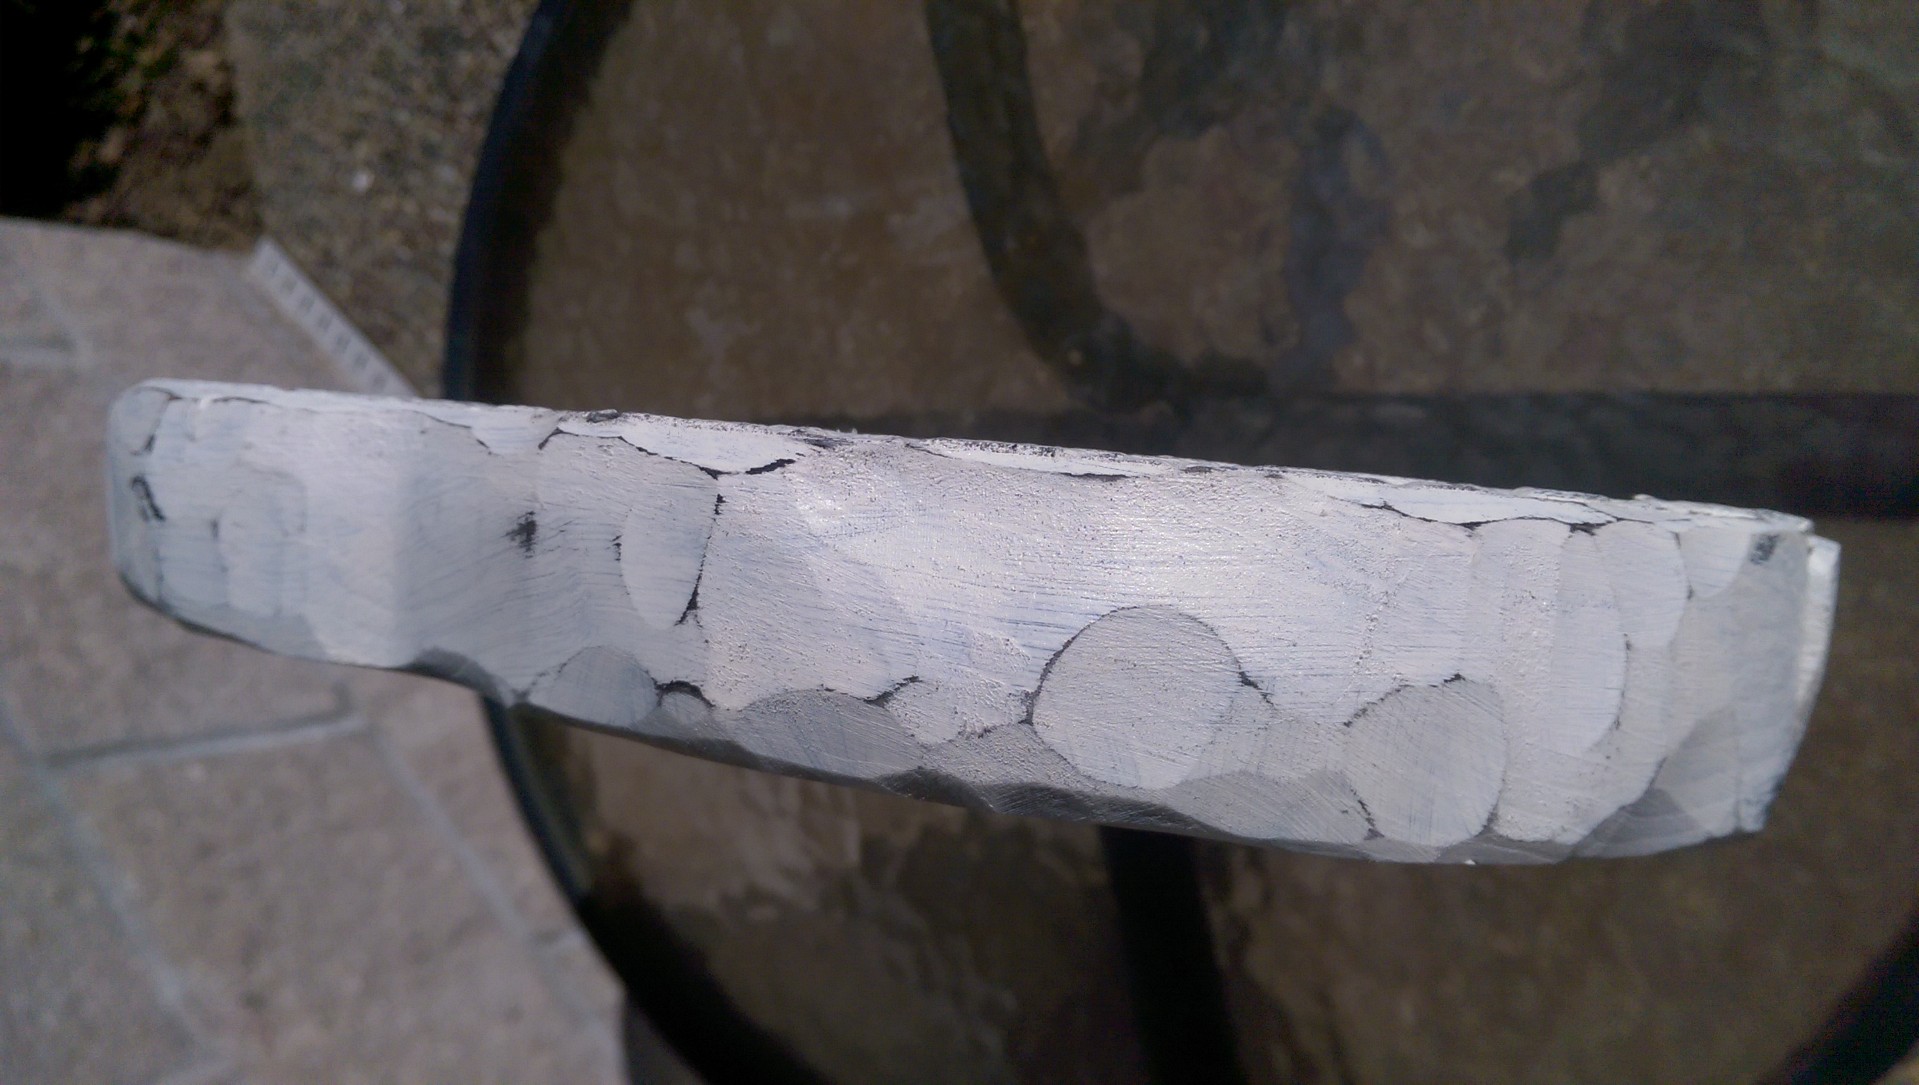
I wanted the pumpkins to look nice and finished and not thrown together so I made sure to “caulk” the edges with spackling.

See how much better the spackled part looks?
I chose to paint my pumpkin a nice white, but orange, black, aqua or teal would be equally nice. I had originally painted mine black with the intention of sanding the edges to allow the black to show through, but ended up liking the white, un-distressed look.
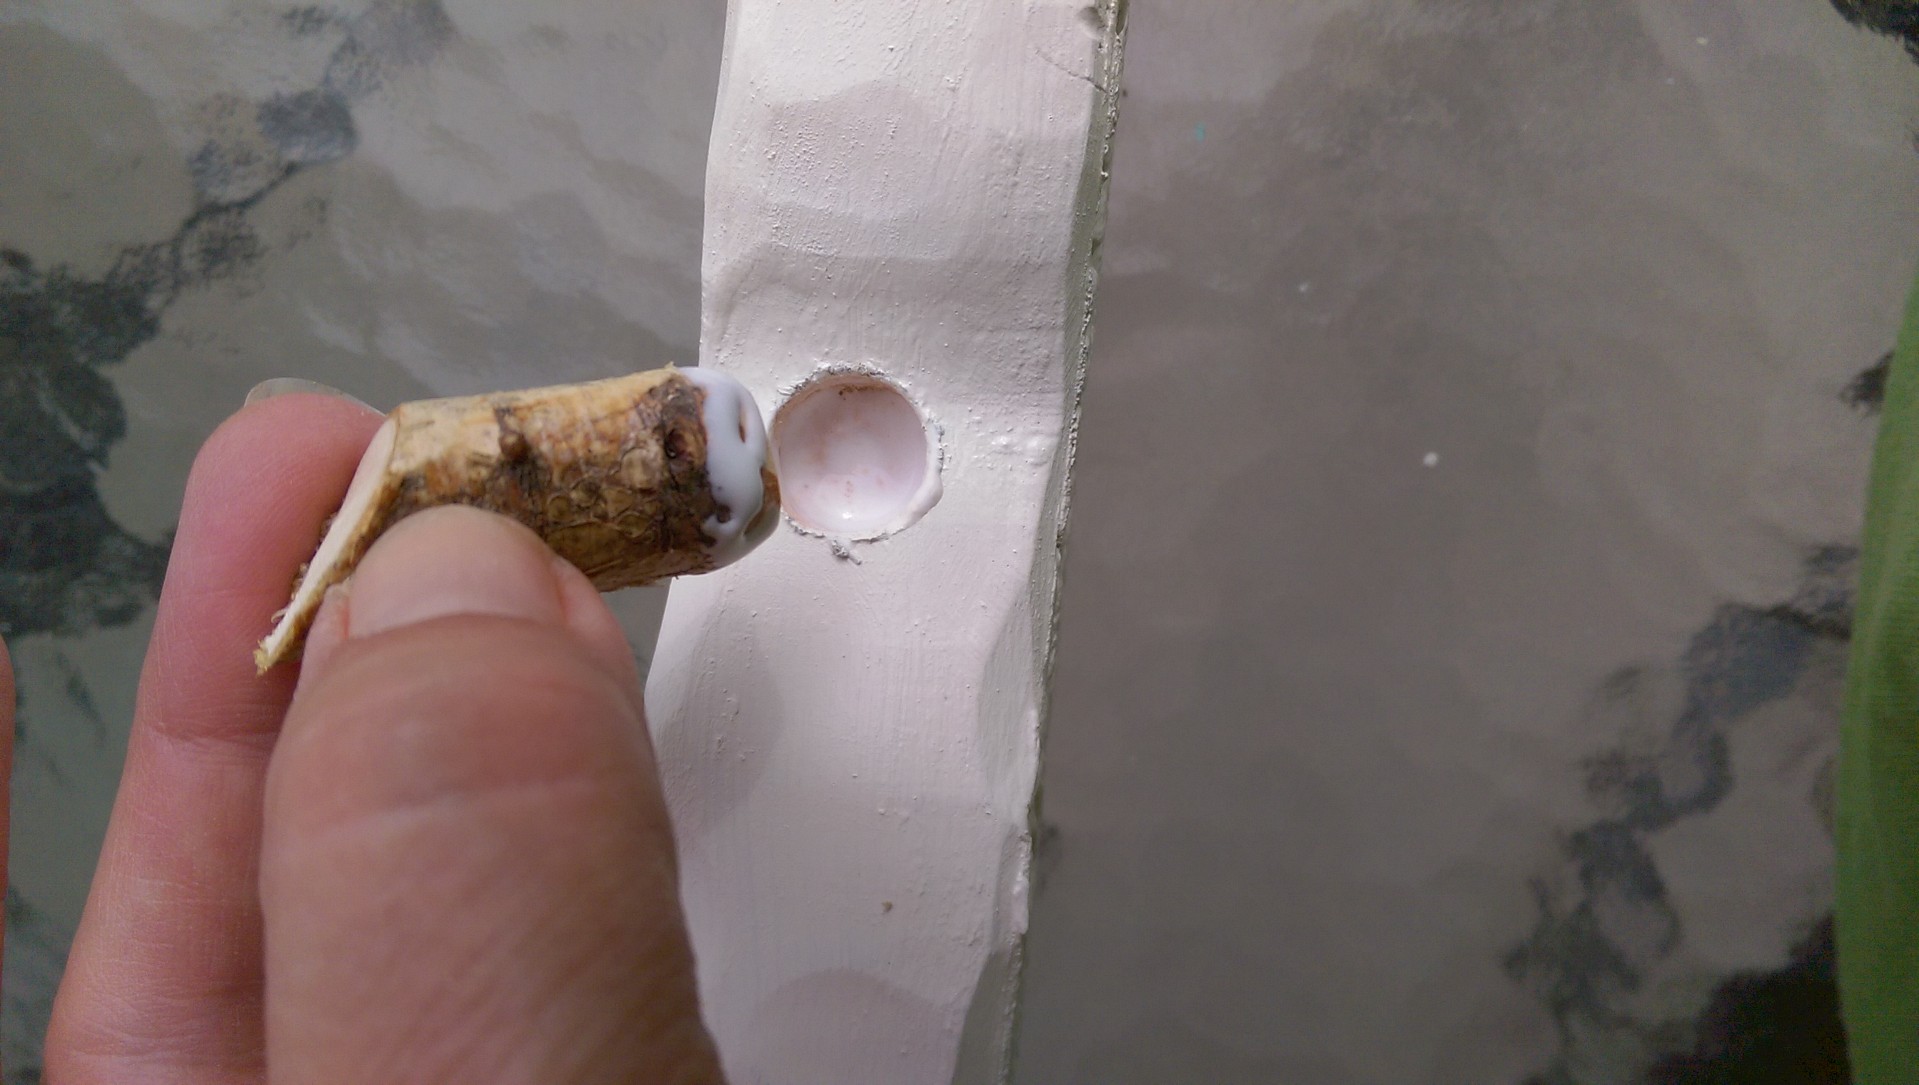
My stalk is a cut piece of a branch from a tree in my yard. If wishes were fishes, I would have made it longer, but by the time that I decided that, the darn thing was too attached to remove.
Once the paint dried, I assembled the pieces:


A few twist of baling wire forms the tendrils. I also added some silk leaves and some natural raffia…


And, there you have it… a finished pumpkin.
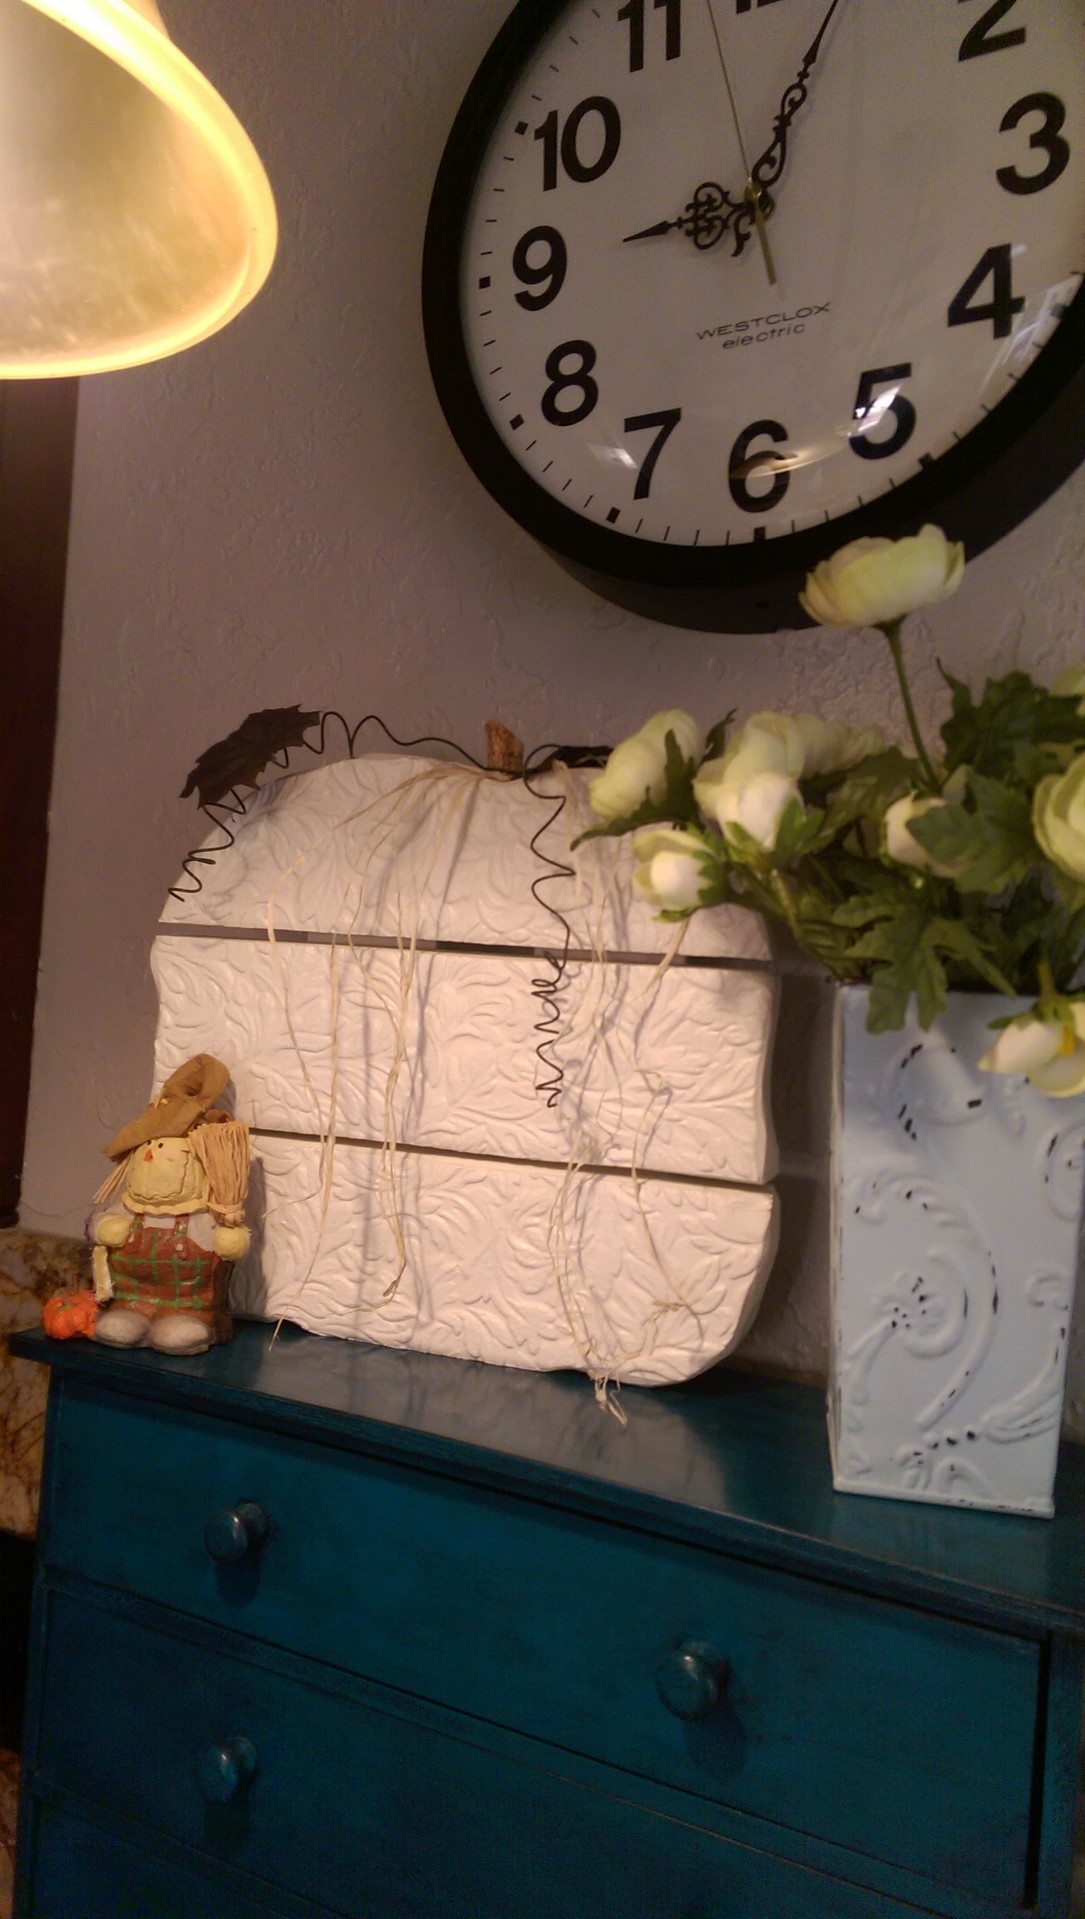
I’m kind of liking my new pumpkin. What do you think?

********* Linking up to these awesome parties!*********
———This post was FEATURED!!!———–

http://www.cozylittlehouse.com/2015/11/tweak-it-tuesday-166.html

Funky Junk Interiors: DIY Salvage Junk Projects
Intelligent Domestications 101 + Pumpkin Decorating Ideas:


Great idea! Some many fun things you can do with textured wall paper! Have a great week 🙂
LikeLiked by 1 person
I love the stuff! Thanks for stopping by!
LikeLike
Who knew textured wallpaper would decorate a table top so nicely😊
LikeLiked by 1 person
Thanks! You are sweet!
LikeLike
Your pumpkin turned out really nice. I love the texture on it. I will have to checkout texture wallpaper. Never even thought of using wallpaper in my crafts. Thanks for sharing how you made your pretty pumpkin.
LikeLiked by 1 person
I love the country elegance. You are so talented!
LikeLiked by 1 person
Oh, Joy! You are so kind! Thanks!
LikeLike
I have seen a lot of wooden pumpkins, but this is the first one I have seen textured. What a great idea!
LikeLiked by 1 person
I’m loving white pumpkins this year and love the idea of texture, as well. Thanks for stopping by!
LikeLike
Very pretty. Love the texture!
Shelley
LikeLiked by 1 person
Thanks so much, Shelley!
LikeLike
This is really pretty and very original too. I’ve never seen it textured before it adds a note of sophistication to the pumpkin. Thanks for sharing your work with us.
LikeLiked by 1 person
Why thank you! It’s fun to come up with original ideas. Thanks for stopping by!
LikeLike
I love your pumpkins! It’s such a great and unique idea. Pinning. This technique would be great for making Christmas trees too. So many possibilities!
LikeLiked by 1 person
A Christmas tree would be awesome! I already have the beginning stages of a similar snowman. Stay tuned! Thanks for stopping by!
LikeLike
I LOVE how you used the textured wall paper on your pumpkin! I’ve been thinking about using paper like that fr a furniture project for a while. Hitting your edges with the sander was brilliant too, it’s the finishing touch:) Such a fun project. Pinning!
LikeLiked by 1 person
Thanks! I only have a little bit of this awesome textured wallpaper and I was happy to figure out a project to really show it off. Thanks for your kind comments and for stopping by.
LikeLike
Hi Sharilee,
Your pumpkin is simply gorgeous. I’m stopping over from Tips & Trick Linky and I can say that it looks even better on the blog. I love that you challenge yourself. I enjoy that part of blogging too. I think it really helps you get creative and this project sure does show it. I also love how well you described each step so that anyone can make this projects. Well done. Thanks for sharing and hope you stop back next week!
Patti from Garden Matter
LikeLiked by 1 person
Thanks for your kind and beautifully written comments. I will be back next week, for sure!
LikeLike
This project turned out absolutely adorable, what an excellent job! I love your pumpkin! That is so creative, I am a directions person and usually follow them to the T. 😉 Thanks for sharing this at the Happiness is Homemade Link Party this week, beautiful work! 🙂
LikeLiked by 1 person
Thanks so much! Sometimes I wonder if my tutorials are too lengthy, but I try to include all details that I can think of. Thanks for hosting the party!
LikeLike
This is so lovely! Thank you so much for sharing with us at Brag About It!
~Laurie
LikeLiked by 1 person
Thank you and thanks for hosting an awesome party!
LikeLike
What a gorgeous pumpkin. I love the texture on it.
LikeLiked by 1 person
Why, thank you! I love textured wallpaper. It is such an easy way to spiff things up.
LikeLiked by 1 person
So pretty and what an original idea! I love how unique this project is.
Thank you for sharing this week at Brag About It link party on VMG206 (Mondays at Midnight).
~ Megin of VMG206
LikeLiked by 1 person
This is so interesting and unique. Love the pretty texture and color. Thanks for sharing at The Creative Circle.
LikeLiked by 1 person
Why, thank you!
LikeLike
[…] […]
LikeLike
FEATURE: DIY textured pumpkin, by Arm Chair Decorator Blog […]
LikeLike
Wow, that texture is amazing! Who knew it could be so easy? This outcome is so cool!
I’ve featured you this weekend on DIY Salvaged Junk 349. Thanks for linking up last weekend! 🙂
LikeLike
Thanks so much! What an honor! I love your blog!
LikeLike
This turned out so neat! Thanks for linking up with Merry Monday last week!
LikeLike
Thanks so much!
LikeLike
[…] Textured Wooden Pumpkin from Arm Chair Decorator Blog […]
LikeLike
[…] Textured Wooden Pumpkin from Arm Chair Decorator Blog […]
LikeLiked by 1 person